Puppy Love + GiveAway...

Saturday, July 30, 2011

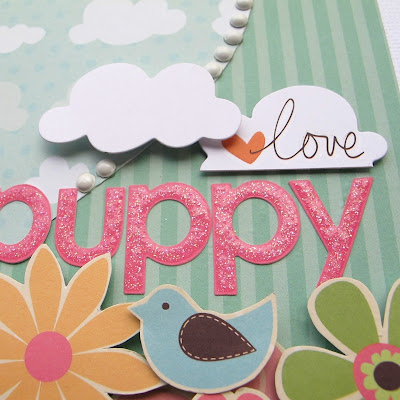
Last week I shared an Imaginisce project using My Little Shoebox alphas as part of a manufacturer swap for the month of July. Well today I get to share the other half of the equasion, a My Little Shoebox 'Home Tweet Home' layout using Imaginisce glamrocks and the i-rock.


I love this photo of my daughter and her K9... they had been running wild all afternoon and when everything went quiet I found the two of them had curled up in the afternoon sunshine and dozed off for a nap.


The MLSB Home Tweet Home is one of my favourites because it has lots and lots of flowers and critters for fussy cutting so I could create a layout that was very much back to the style that I love to scrap... whimsical, lots of layers, loads of hand cut elements and a few clouds and critters.


I decided to use the Imaginisce i-rock and frame the heart shape patterned paper with a full row of white glamrocks... defnitely my all time favourite from the i-rock range as they go with everything.


GIVEAWAY


I have been so fortunate to recieve a huge stash of product from both My Little Shoebox and Imaginisce so I thought it was time that I spread the love around. I have put together a nice little package of Home Tweet Home Papers, an Imaginisce i-rock tool and a selection of i-rock accessories.
So, if you think you have room in your scraproom and can provide a good home to this parcel then please leave a comment here, make sure you are a follower of my blog, then pop over to the My Little Shoebox blog HERE, become a follower and check out the other projects that combine MLSB and Imaginisce and leave a comment.
Winner will be announced on my blog on the last day of August.
Thanks for stopping by and good luck!

From farm to you...

Another mask for the wall...

Friday, July 29, 2011

It's Free For All Friday time on the Pebbles blog today which meant I got to let my hair down and go wild! Figuratively speaking of course. LOL! Free for all Friday simply means that we can create whatever we like using whatever products and collections we feel like using at the time. So, I figured it was time I made another mask for my daughter's bedroom wall as she has been reminding me of late that it's been quite some time since the last addition. *oops*


I've had this plaster mask sitting patiently in a box under my desk for months but it had a mustard yellow eye which didn't inspire me in the least. So after deciding the mustard had to go I rummaged through my very small glitter supply and found this gorgeous teal colour knowing it would be a perfect blend with the new Pebbles Floral Lane papers.


I will be the first to admit that I love feathers, especially ostrich feathers and I've had this beauty tucked away waiting for a day where I could use it in a way that gave it maximum impact. I hot glued it all the way around the mask and instantly loved the effect as it fluffed itself out in all the right places and sat flat around the face creating a perfect frame. It also gave me the ideal line for my flowers and leaves as I hadn't really worked out what I was going to do with them until the feather was glued down and gave me the inspiration I needed.


The flowers were really quite quick to make as I used a flower pattern from the Cricut 'Straight From The Nest Cartridge', rolled the edges and then glue them together using a hot glue gun. The leaves were hand-cut from coloured hessian (burlap) and I was really thrilled at how easy the Pebbles 'Candy Dots' adhered to the fabric. I can promise you, once they were on... they were there for the keeping.

 
And to finish the project I added a row of the Pearl Candy Dots across the front of the plaster mask to add some dimension.

There you have it, my new favourite mask for my daughter's room and when we've finished painting her room and her furniture is moved back in I will take a photo of her mardi gras wall with the masks I have made her so far. But guaranteed by the time we've finished there might be another couple of additions... hope so!

 From farm to you...

Love Letters...

Wednesday, July 27, 2011

My Little Shoebox asked the design team to focus on journalling for our July projects so I decided it was time to throw caution to the wind and attempt another mini album. Now mini albums are probably the one item that I dabble with least as the concept is something that I struggle with... why? Who knows! Anyhow, I put together a keepsake for my daughter filled with lots of things that I've wanted to tell her now that she is moments away from her teenage years.


The base for my mini album is a gorgeous chipboard butterfly album from Kaisercraft which takes all the guesswork out of preparing your surface... thankgoodness or I just may never get a mini album complete. I used the Home Tweet Home collection from My Little Shoebox as I loved the gorgeous colorscheme and the cute birds and flowers worked perfectly with the butterfly theme.


And how fun is this... I even got to play with my i-rock and white glamrocks as MLSB were swapping products with Imaginsice this month so I got to play with both companies and blog about it!


I haven't included a photo of the back page because it's a very personal journey between mother and daughter. Hope you don't mind.

From farm to you...

So this is Christmas...

Tuesday, July 26, 2011

Okay, I know it's only July but it's the only month of the year where people on opposites sides of the world get to experience what Christmas is like for each other. Now, I live in Australia and Christmas at our house is always celebrated around the swimming pool with ice-cold drinks, cold meats, seafood, salad and beautiful cold desserts including the familiy favourites of cheese-cake, chocolate mousse, trifle and pavlova.
So when Imaginisce brought out their Santa's Little Helper collection and asked us to create projects with a theme of Christmas in July, I started thinking about what Christmas would be like on the other side of the globe. Cold weather, possibly even snow, hot mugs of egg-nog, chestnuts being toasted on the fire and definitely a hot meal inside the house.

It really doesn't matter where we celebrate the festive season, what matters is that we are together and that the original reason for Christmas doesn't get lost amongst the hype and commercialism that so often overshadows the whole meaning of the day.

So, instead of doing a layout with photos of presents being unwrapped, or someone who has overeaten and can't get out of their chair, I decided to create a framed keepsake that will act as a reminder of why we have come together on Christmas Day.


And for a bit of extra fun, I got to use My Little Shoebox Glitter Alphabet stickers on an Imaginisce project because the two manufacturers are having a product swap. And because I'm on both teams, I get to have twice the fun when I reveal my projects for My Little Shoebox that use Imaginisce products... confused? He he


A moment of madness!
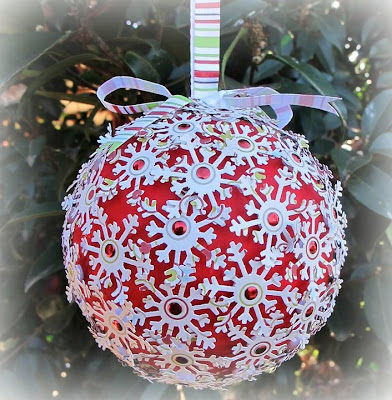
Every now and again I have a moment of madness where I come up with an idea for a project without really thinking about the consequences of how long it is going to take... A Christmas bauble! You would think a simple little thing like a decoration to hang from a Christmas tree would be a quick and easy exercise... well stop right there! I thought the same and boy was I wrong. Grrr, I'd planned on doing a few projects in the one evening and guess what? I only did one!


I'm happy with it now, but at the time I cursed this little sucker more than I think it deserved! And here's a quick look at how I put this little ornament together.

1. Take one polystyrene ball.


2. Paint it! Put it in front of the fire to dry, then have to repaint it again because it fell off the stand, rolled onto the floor and took half the paint off. Then clean up the paint spill on the floor.


3. While you are waiting for the paint to dry the second time. Start punching out about 40 snowflakes, it's amazing how many it will take to cover such a small ball.


4. Using pop-dots adhere your snowflakes to the ball... be warned, you need to get them in the right place first go because if you try to pull them off to move them you will end up painting parts of your ball for a third time.


5.Add a bow with extra ribbon to hang your bauble. I used a concealed pin to attach my bow. Now, go back and add a step in between steps 3 and 4 because I forgot to put glamrocks on my snowflakes using the i-rock and seeing as I couldn't pull them off without taking half the paint off and having to re-paint my ball again. I had to add the glamrocks to the snowflakes after they were already attached to the ball so they wobbled around, fell off before I stuck them down, drove me nuts and basically caused me to have a slight melt down at this stage.


So, if anyone decides they want to make a Christmas bauble, I sincerely recommend buying them instead. On that note, I would like to wish everyone a very merry Christmas in July.

Don't forget to pop over to the Imaginisce blog to see all the amazing creations from the design team and to be entered in their give-away for one of three Santa's Little Helper prize packs.

From farm to you...


Winners + Sneak peek!

Friday, July 22, 2011

Where does the time go... we are suddenly approaching the end of July and yet it seems like only yesterday that we hit July 1. The only consolation in time going fast is that winter will be over and the weather will start to warm up as I'm sooo over being cold.

Now, I was supposed to post the winners of the Snag 'Em stamps competition on the 15th, so I must apologise as I'm a bit late. So, I'd better not ramble on any longer and announce who the lucky winners are...


Jenscrapstoo said...
Wow, love your projects!! What wonderful ideas you have!! Thanks for the chance to win Cheers jendewar at optusnet.com.au


Carol said...
Melinda - I love love the wreath! Perfect for fall! Fabulous layout! The picture placement is awesome. TFS

Congratulations to Jenscrapstoo and Carol!
Could you please email me at thescrapfarm@bigpond.com
with your address details and I will get your prizes posted out.

Now I have been working away on lots of projects but as per usual I can't really share anything just yet other than a few little sneak peeks. So here's a brief look at what I will be sharing in the near future.


Okay, well that's if for now, I hope everyone has a lovely weekend and I will be back in a couple of days with a full reveal of one of the above sneaks.

From farm to you...

30 minutes of madness...

Wednesday, July 13, 2011

My design team co-ordinator Lynn over at Pebbles really knows how to push us gals to the limit and she has this particular challenge that freaks me every time. Whip-it-Up Wednesday, where she asks us to create a project in under 30 minutes. Yes, I can already hear my scrappy friends laughing to themselves and wondering how I can manage to do anything crafty in under 30 minutes. You see, I've been the butt of many a joke about time issues when I took two days to make one card at a retreat and because I was surrounded by a table of wonderful and dear friends, they've never let me live it down.

So, this challenge was a way of redeeming some self esteem and proving to certain people (love you dearly) that I can actually produce a card in under 30 minutes. And to really give myself some extra credit I decided to make a three-card set just to prove I'm not a total flake. :)


I used the beautiful Pebbles 'Ever After' collection and saved lot of time by attaching the jewel flourish stickers so most of the work was already done, I just had to pick where to stick my bling.  I also added little pops of rhinestones to the corners of the diamond embossing pattern I used and boy was that laugh trying to emboss  at a million miles an hour and then stick on those tiny little diamentes.


So there you have it... three cards in 30 minutes and the biggest scrappy mess you've ever seen. I actually took a whole lot longer to tidy my desk than I did to make the cards. The farmer ran for the hills too, because he had no idea why there was product flying from one end of the place to the other. LOL! It was good for the soul.

Don't forget to pop over to the Pebbles blog to see another gorgeous project from Eva that incredibly she did within the 30 minute time frame too - a beautiful layout celebrating turning 30 (oh to be that young again).

From farm to you..

A new find...

Sunday, July 10, 2011

I love CHA time as the internet is all a flutter with new and exciting collections from the manufacturers or even perhaps a new manufacturer. I was browsing away on facebook and stumbled across Authentique, a new paper company just starting out and they are about to conquer their first CHA.

Now, I will be the first to admit... Authentique is not a style that I would usually get excited about. However, the first thing that caught my eye was the 'grey'. I'm a huge fan of grey but never get to play with it in my scrapping because it's not often used by manufacturers. So when I spied a company who was willing to use 'grey' as the new black I was totally intrigued to the point that I made my first purchase and waited patiently for the postman to arrive.


Okay, I know this layout is very different for me with all the florals etc and not a critter in sight, but gee I had fun. And it was so nice to do a layout just for me... no deadline, no theme, no products I had to use... just for fun!


 Now, I can honestly say that Authentique products are better in person than veiwing them on-line... the quality is superb, so much so that your paper gives that delightfully crisp cutting sound when you are snipping away with your scissors.


The large alphas are quite thick which made them perfect for cutting around each letter and still have them hold their shape. The mini alphas and words won't fall off your page in a hurry as they peel beautifully from their packaging and stick fast once down.


I decided to re-create the floral pattern by hand stitching larger versions of it on the background cardstock which of course had to be grey. I then added hints of chalk inside the stitched areas just to highlight the pattern.

Well that's it for my project and I must say, I think I'm going to have to down tools on required projects a bit more often and simply scrap for the fun.


From farm to you...